Monday, September 16, 2013

$50 Poster Frame

For the last few years I’ve experimented with a variety of framing techniques searching for a nice, high quality, system to display my photos at a reasonable price. In this posting I will describe the details of what I think is the best way to produce a low cost framed print. I will describe the methods for some other styles in the coming days.

First a photo of the finished product. Dane Anderson and his friend Reg Down of Woody Boater traveled all around Minnesota this summer working together to produce a series of articles (seven parts… so far) about the vibrant wooden boating community in the State. As a way to thank some of the folks who shared both their time and passion Reg and Dane decided to produce poster prints to be presented as gifts. Dane and I worked together to refine the layout of the poster and produce the prints. Reg’s image of Kermit Sutten behind the wheel of his spectacular Belle Isle Super Bear Cat (Ondine) below is a product of this effort.

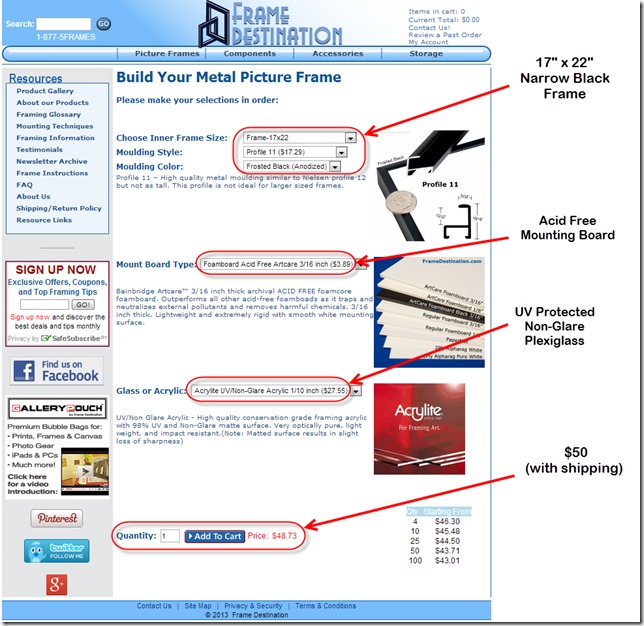
The frame comes from the online frame store… Frame Destination. They provide what I think is the best combination of quality and price available anywhere.

Frame Destination

$50 buys a 22” x 17” anodized aluminum frame with a mounting board and UV protected/anti-glare Plexiglas.

Frame Destination 2

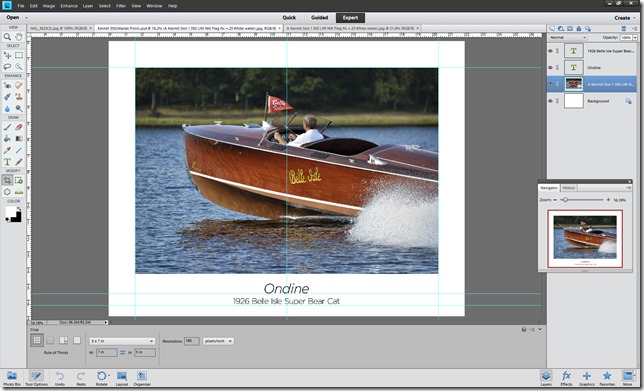
Producing the print using Adobe Photoshop Elements 11 very straightforward. We start by carefully thinking through the layout of the finished print. We decided to produce a “poster print” that includes a title positioned directly below an image centered in the frame. Getting the aspect ratios that produce a “pleasing” result has been somewhat of a journey over the last few iterations of prints. I have settled in on one and five eights inch (1.625) borders around three sides as my current favorite. 

Layout

The first step is to crop, straighten, and re-sample the original image to using the pixel dimensions and resolution desired in the finished product. In this case the crop tool is set to 5625 pixels by 3825 pixels at a resolution of 300 pixels per inch. This results in the desired 18.75” by 12.75” image.

Sutten Photoshop 2

Next we “enhance” the re-sampled image of Kermit in the Belle Isle Bear Cat (note the “new flag” from another image and the straightened shoreline). Liberal use of the NIK Collection helps immensely in this effort. Saving the result of this as a separate file is a good practice in case you need to make additional changes in the image later.

Enhance

We then create a new 22” x 17” blank white canvas and “pull” guides onto the surface to help as we precisely align the image in the space.

Layout guides

Finally the enhanced image is dragged onto the new canvas and “snaps” into place inside the guides. A title is is placed under the image and the new file saved. The result is this very nice poster ready for printing and frame.

Sutten Photoshop 4

A set of three framed posters ready for delivery…

IMG_3623(2)

Monday, September 9, 2013

More NIK Collection

I reached way back into my photo archive and pulled out this photo of Engine 261 taken during an excursion to Willmar Minnesota to show off the possibilities using the NIK Collection inside of Photoshop Elements 11.

First an enhanced version of the image using Color Efex Pro (Strong Tonal Contrast)…

OLYMPUS DIGITAL CAMERA

Next a version using the Dramatic High Key filter…

OLYMPUS DIGITAL CAMERA

A Bright Sepia version…

OLYMPUS DIGITAL CAMERA

And finally a Black and White conversion using NIK Silver EFEX Pro…

OLYMPUS DIGITAL CAMERA

Wednesday, September 4, 2013

NIK Collection (Before and After)

In the previous posting I described using the NIK Collection Plugin for Photoshop to enhance images. Here I want to provide a before and after enhancing example using a photo I shot with my Canon G15 on the way to work in April 2013. I applied the “Strong” Tonal Contrast filter in NIK Color Efex 2 with a single click (i.e. no additional modifications to the original). The results are really amazing and could (of course) be dialed back or exaggerated easily.

IMG_2298(2)

IMG_2298(NIK)

Friday, August 30, 2013

NIK Collection

A while back I recommended Shape Collage calling it the best $40 I ever spent on software. I’m back today to make a pitch for the NIK Collection plugin for Photoshop by Google (yep… that Google). NIK software has been around for a long time as a collection of photo editing tools based on a “filter” model (think high-tech Instagram). Google acquired NIK about a year ago and has not only improved the system but also dropped the price dramatically (from $500 down to $125). I believe that the NIK Collection is a great value.

It is fair to say that NIK has completely transformed the way I use Photoshop. I have embraced the NIK system and their tools are now an integral part of my photo enhancing workflow. In the space below I will show how to use the NIK tools as a plugin inside of Adobe Photoshop Elements 11. The fact that the NIK system works in all versions of Photoshop is the best part of the whole deal. I can now achieve results using the $60 version of Photoshop Elements 11 that I would have struggled to produce in the $700 version of Photoshop CS6. More importantly I can get much better consistency image to image using the “filter” approach inside of NIK.

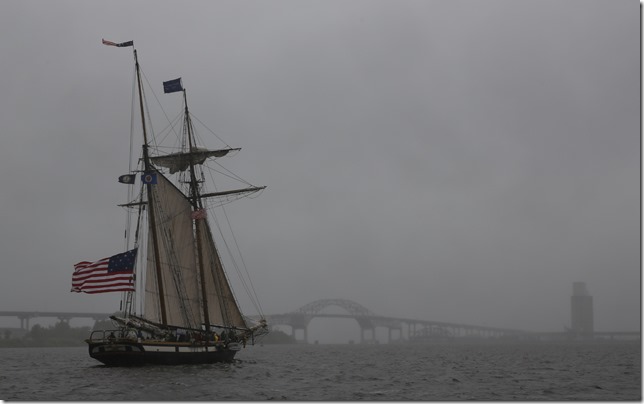
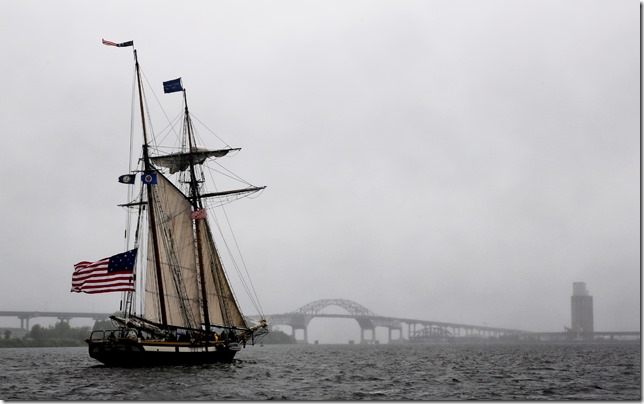
First a before and after shot of a photo taken at the Tall Ship Festival in Duluth. The top photo is a cropped JPEG right out of the camera. The enhanced image is just below.

Tall Ship (before)

Tall Ship (After 2)

The process starts by calling up the NIK Collection from the filter list inside Photoshop Elements 11. The NIK Collection includes six tools to enhance digital images. In this example I am going to use the Color Efex Pro 4 tool at the top of the list.

Nik Software 1

Color Efex Pro 4 is a comprehensive set of filters for color correction, retouching, and creative effects. The tool consists of 55 filters in a list running down the left hand side of the dialog box. The filters included are not just a random set of photographic filters. Each of the filters is designed for a specific task and can work together with all the others to provide nearly infinite creative possibilities. As a long time Photoshop CS user I will say that the NIK Collection provides me with not only better results but also a far wider range of possibilities. Furthermore I feel that I get more consistent results using the NIK’s filter approach to enhancing images.

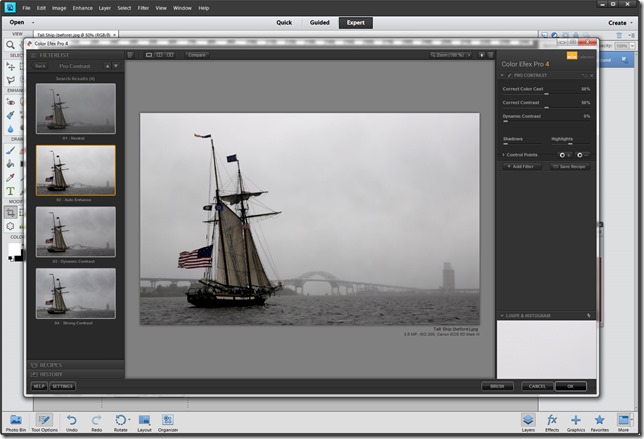
In this example I am going to select the Pro Contrast filter.

Nik Software 6

This filter opens with a set of four visual presets in the left hand pane that can be used as starting points for the enhancing. The sliders in the right hand pane allow for adjustment of the individual elements of the filter controls. The presets on the left are just different positions of the sliders on the right. Selecting the "Auto Enhance” preset instantly provides a preview of the filter effect. Moving the sliders around allows “tweaking” of the results. In many cases a single click on one of the visual presets will get me a pleasing result.

Nik Software 2

Selecting the OK button saves the result as a new layer in Photoshop. This allows you to further "tweak” the effect of the filter using the opacity slider for the new layer before flattening. A particularly effective strategy for enhancing images is to go a little “too far” with the NIK filter and then “dial” it back using the opacity slider. 

Nik Software 7

To Flatten the image click on the tiny arrow next to the options menu and select Flatten Image from the list.

Nik Software 8

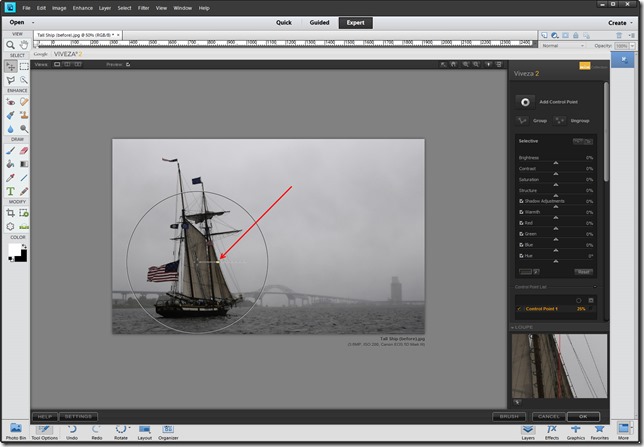
Viveza 2 is a second tool in the NIK Collection that produces stunning results with very little effort. It is also found in the Filter menu inside Photoshop. Viveza 2 enables photographers to quickly enhance images using precise selective enhancements called Control Points.

Vivesa 1

Selecting the ‘Add Control Point’ button allows the user to precisely place a point on the image around which selective enhancements will be applied.

Vivesa 2

Moving the Control Point slider with the mouse enlarges and contracts the effected area. Multiple Control Points may be used in a single image and can be grouped together allowing for amazing control to different areas of an image.

Vivesa 3

Moving an individual slider back and forth applies the effect to the selected area. In this example I have increased the Brightness for the control point to a value of +75%. Individual sliders control Brightness, Contrast, Saturation, and Structure as well as Shadows, Warmth, and Colors.

Vivesa 4

Once again exiting the NIK Software results in the creation new layer in Photoshop that can be adjusted using the opacity slider.

Vivesa 5

Wednesday, August 28, 2013

The New Smugmug

After a couple of years of waiting and a lot of hand wringing Smugmug recently launched their new online photo sharing system. I have a “power” account with Smugmug and have already created a new look for my site. The new Smugmug system provides users with design templates (24 so far…) that can be used “right out of the box”. The system also allows a user to radically customize the look and feel of a site using one of the design templates as a starting point. My new site is a customized version of their ZOE template.

The best feature of the new Smugmug system is their new organizer. Smugmug now allows users to have six levels of folders (up from only two) greatly enhancing the possibilities for organizing the photos. I have just started to take advantage of this new feature and think users will find the site much easier to navigate.

I’m especially happy that my friend Millie agreed to help me welcome guests to the new JWPictures

New Smugmug

Tuesday, January 1, 2013